To verify a candidate's previous employers, DriverHub has a comprehensive interface built in to carry out and track all contact attempts.
Note: As of 5/2022, Faxing is no longer an option within DriverHub.
As of January 6th, 2023, motor carriers will no longer be required to make drug-and-alcohol inquiries to previous employers. Employers will continue to make employment history and safety history inquiries with previous employers as part of the Previous Employer Verification requirement.
Contents
- Before Implementation
- Adding The Action To The Workflow
- Using the Previous Employment Verification Interface
- Actions
- Completing The PEV
Before Implementation
Before you can use this feature, you must first ensure that you have created a Record Type with a Category of Previous Employment Verification, and that there is only one record type with this category.
You also need to have at least one Employment Verification Consent record type created.
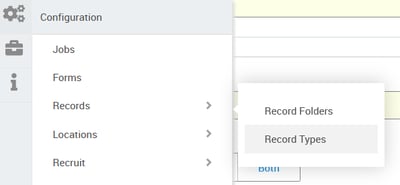
To verify that you have these record types, navigate to Configure, Records, and then click Record Types. In the browser that opens, you can click the Category column heading to sort alphabetically by category, and then scroll to find Previous Employment Verification and Employment Verification Consent. If they don't appear in the list, you will need to create them.
Next, within the workflow of the position where you want to add the PEV widget, you must have a flagged application. This means that when you are adding your steps to apply, the application step must be flagged. To flag the step, click the flag inside the form box.

The last step before using PEV is also located within the workflow of your position. You must have an Employment Verification Consent form in the workflow that is configured to output an Employment Verification Consent record.
Adding The Action To The Workflow
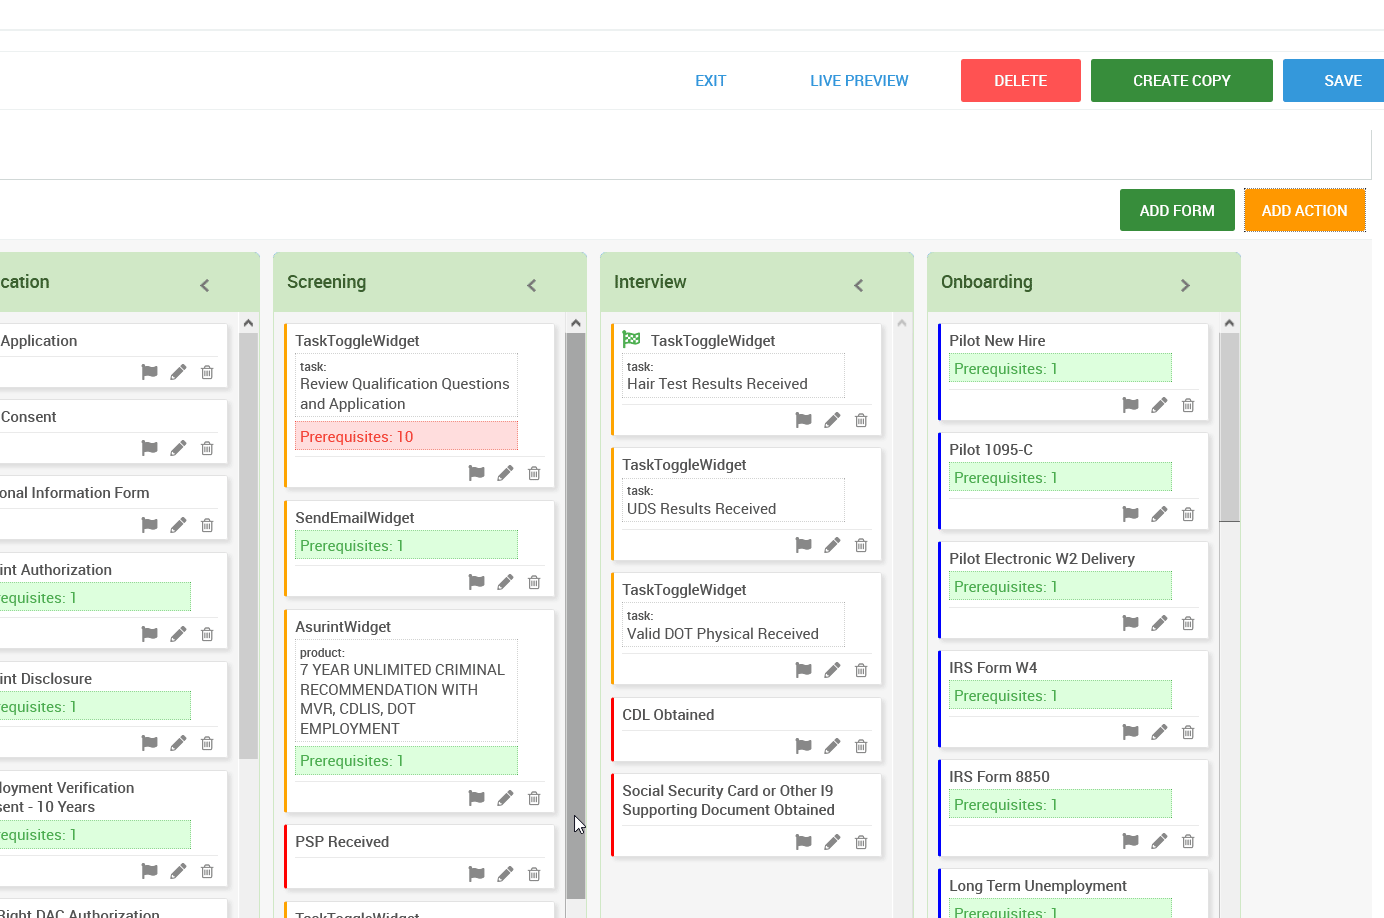
Once all the conditions described above are met, you can proceed with adding the action to your position's workflow. Click the "Add Action" button and choose "Previous Employment Verification" from the first dropdown menu. Next, choose the pipeline for your PEV action to reside in.
Finally, we highly recommend that you make the Application (which we flagged in the steps above) and the Employment Verification Consent form prerequisites that must be completed before proceeding with PEV.
Using the Previous Employment Verification Interface
Now that you've added your PEV action to your position workflow, you can now use it to contact a candidate's previous employers during the application/hiring process.
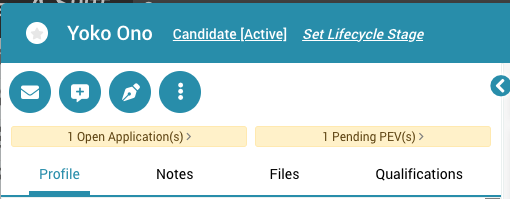
Initiate the process by navigating to your candidate's profile and application, and click the Previous Employment Verification step. Confirm who the assignee will be, and then click Initiate.
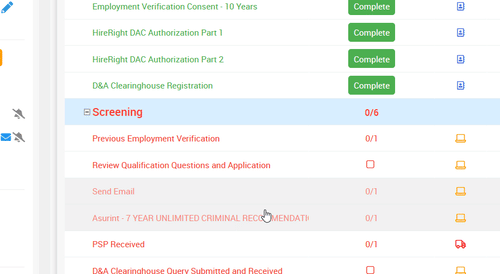
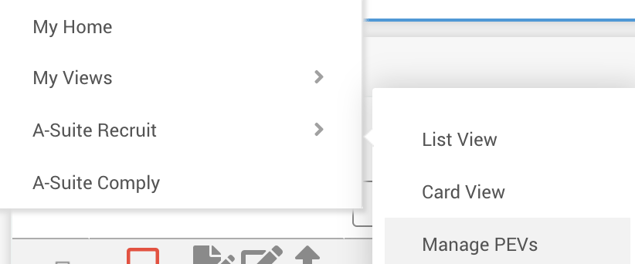
Once initiated, the PEV will be viewable either by clicking the task again, or by navigating to Home, Recruit, and clicking Manage PEVs.
There will also be a profile badge indicating that a PEV is in progress on a user's profile; you can click this badge to be taken to the PEV management screen.
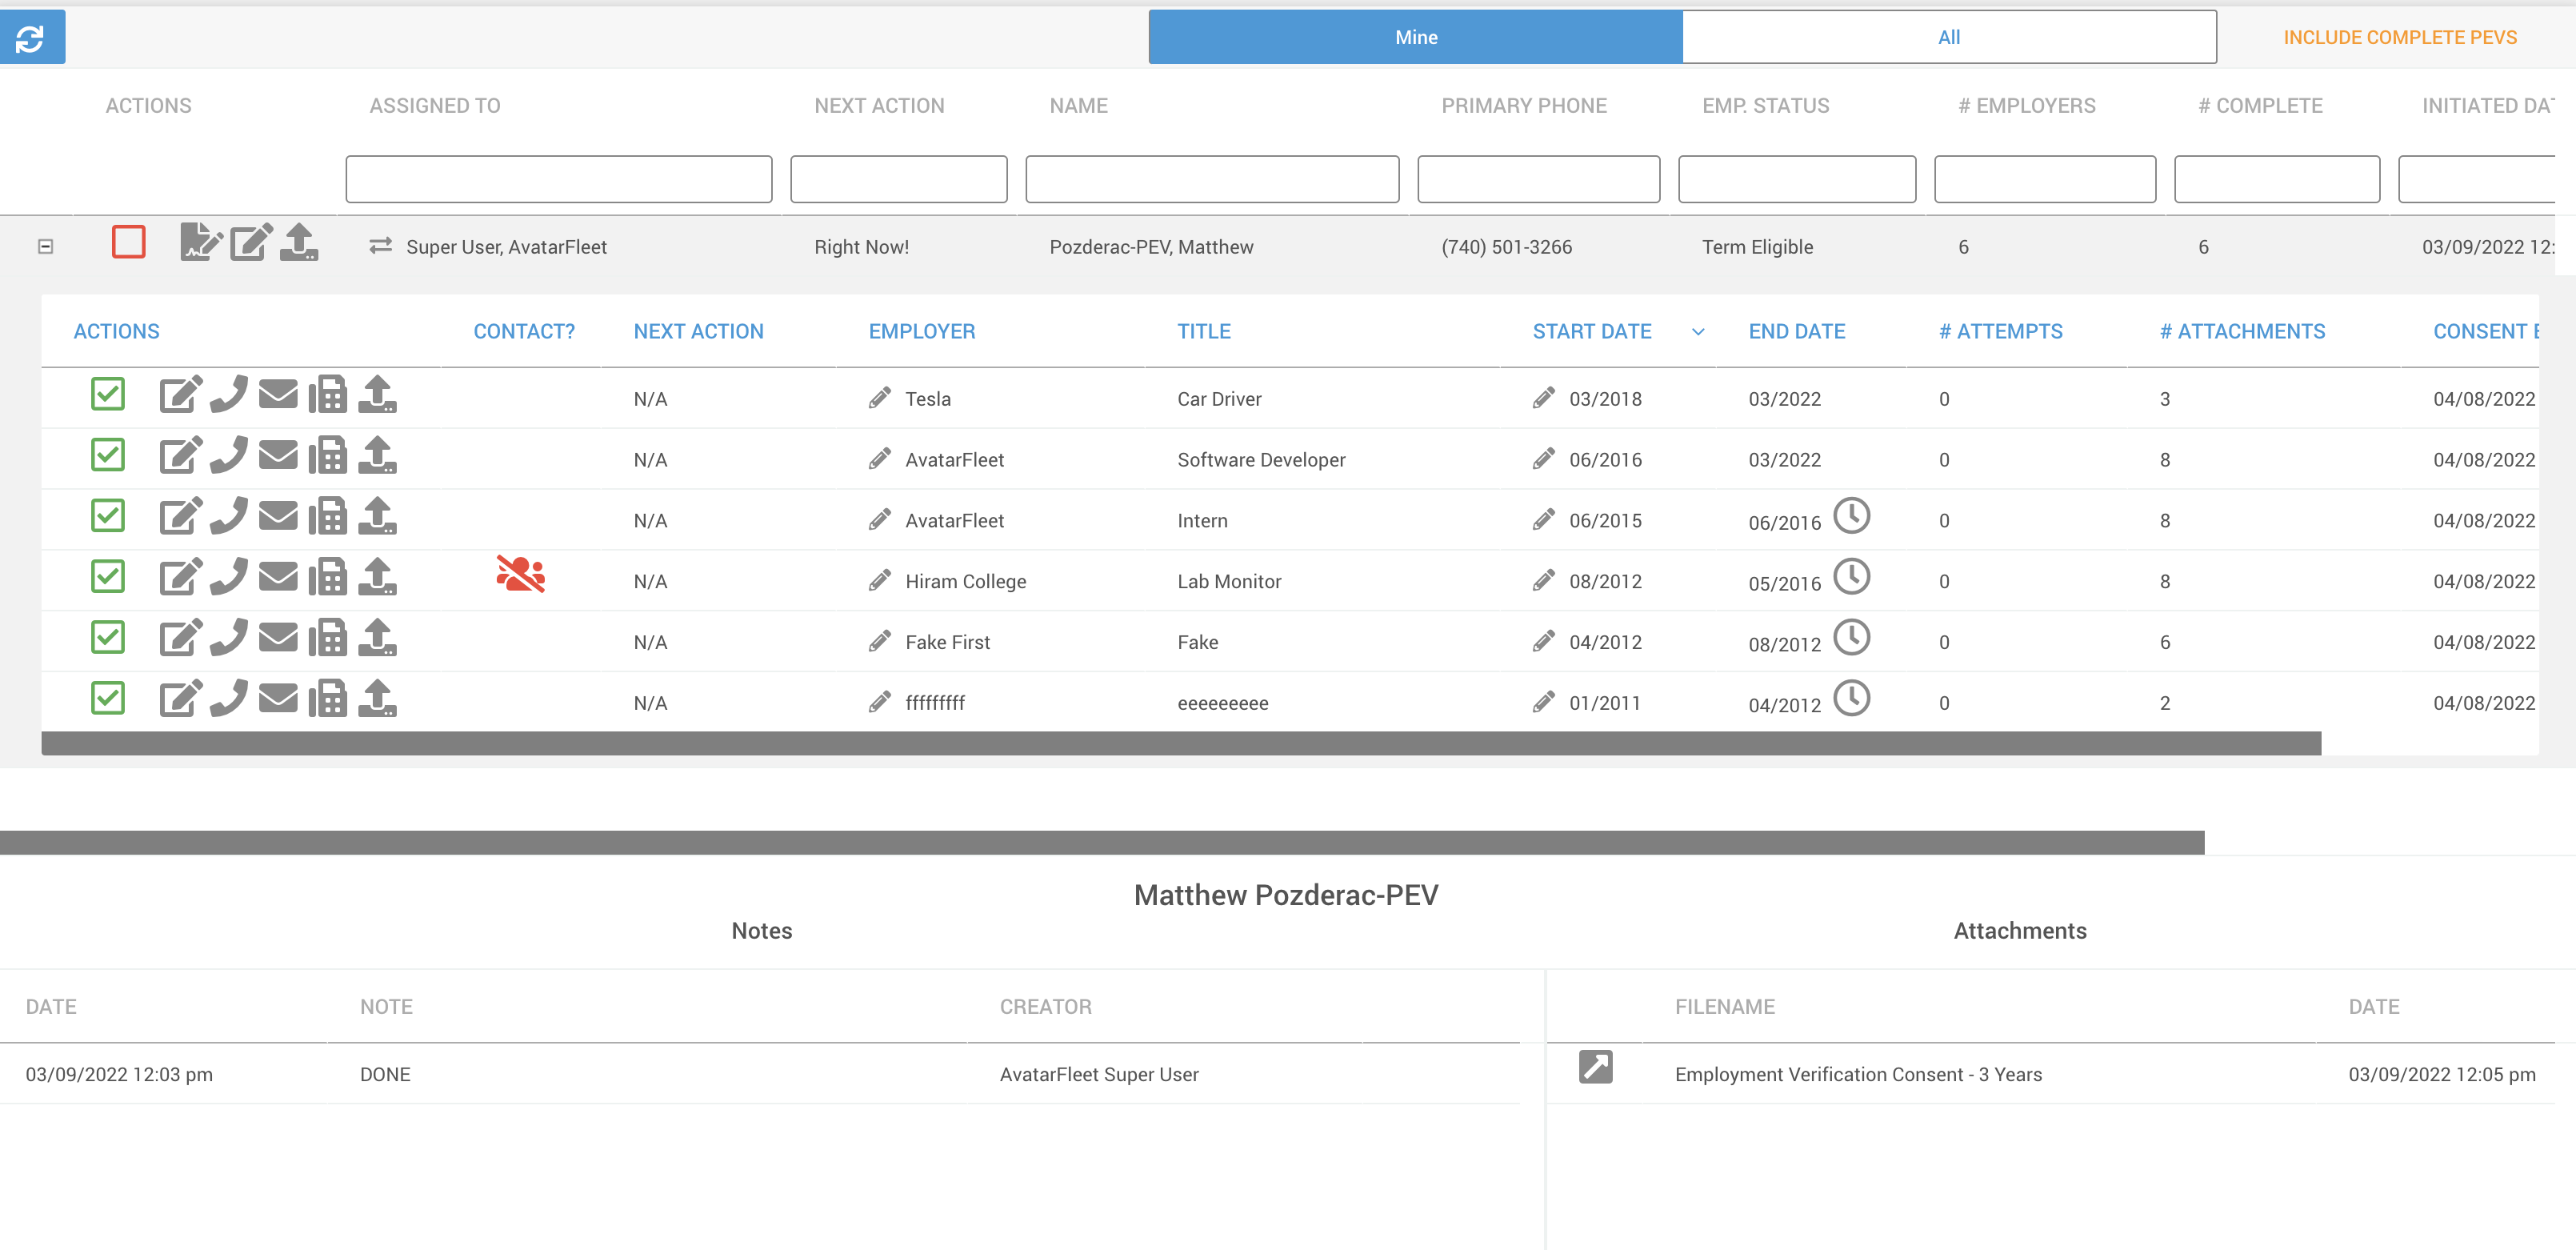
The Manage PEVs screen will appear showing you your in-progress PEVs. The screen is split into three sections:
- The main panel which lists the employers and contains action buttons;
- The Notes panel in the lower left corner;
- And the Attachments panel in the lower right corner.
Actions
When you expand one of your in-progress PEVs, you will see all the candidate's previous employers listed with action buttons.

Mark Complete
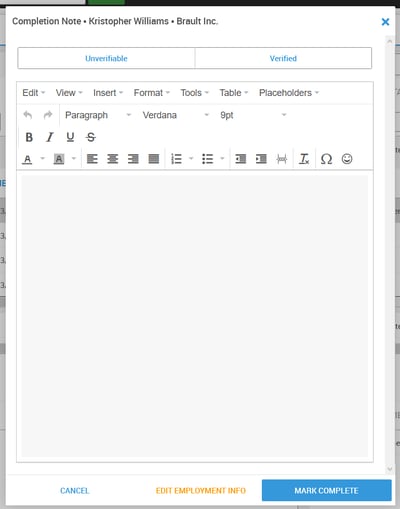
A checkbox where you can click and indicate that the employer was verified or unverifiable. If the employer was verified, no note is required; if it is unverifiable, a note is required.

Compose a Note
Opens a dialog box where you can write about a contact attempt or any other pertinent information. The note will be saved to the notes panel, and will indicate at what stage (e.g. In Progress) the note was created.
You can create a note for a specific employer that will only appear in the Notes panel when that Employer line is highlighted, or you can create a note for the entire PEV.

Attempted Phone Call Note
Opens a dialog box that lets you create a note about an attempted phone call. If the targeted person answers, you can click the "Click Here To Fill Out The Form!" button that gives you the call prompt with input fields to verify the candidate's employment.
When you fill out the form, an attachment will be saved to the Attachments section with the representative's answers.

Send An Email
Opens a dialog box to send the company's contact person an email. A default message will automatically be sent, but you can add additional notes if desired. The email will include the candidate's signed employment verification consent form as an attachment, as well as a button for the recipient to click and complete the verification form.
At the bottom of the email dialog box, you can choose a date to follow up in the Next Action dropdown field, and make it a To-Do by checking the "Create To-Do?" box.

Upload An Attachment
Allows you to upload a file that you may have received outside of the PEV tool.
You can upload an attachment for a specific employer that will only appear in the Notes panel when that Employer line is highlighted, or you can upload an attachment for the entire PEV.

Request Application Changes
Allows you to request that an applicant make changes to his or her application. This icon will take users to this screen in which a user can compose an email or text with a direct link to the candidates application.
After signing their application, the subsequent Consent form associated with the PEV will need to be resigned.
After a candidate signs their consent, each "in process" previous employer will get a fresh consent and the expiration date of it will again be 30 days after collecting the signature.
Other Functions
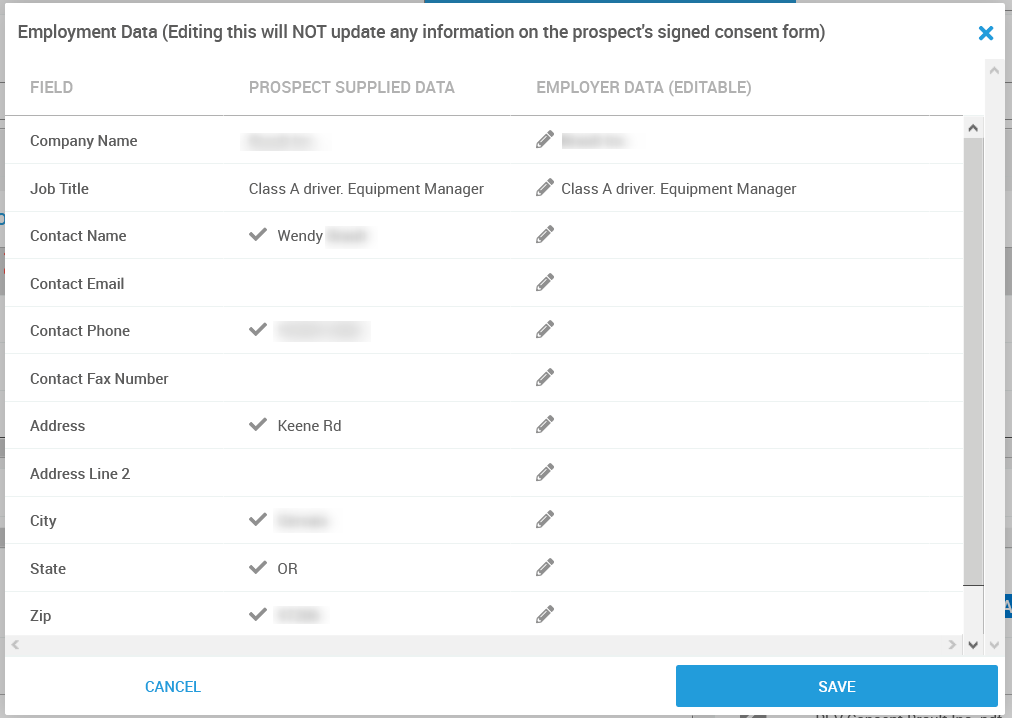
You can edit the employer's contact data by clicking the pencil icon next to their name.
Clicking the check mark in the Prospect Supplied Data column will confirm it in the Employer Data column; you can also provide your own updated data by clicking the pencil icon in the Employer Data column.
Completing The PEV
Once you have finished all of your desired actions, you can click the circular Complete button on the PEV line. If all your actions are not complete, you will see a pop-up asking to confirm completion even though not all employers are marked as complete.
Clicking this button will compile all the employer's data, your created notes, and attachments into a record that will be added to the candidate's profile.
After marking a previous employer as "verified" in the PEV interface, the employment history for the candidate can no longer be edited.
Note:
When starting a new PEV, if one has already been started/worked for the applicant, all data and information will be copied to the new PEV. No need to recreate the wheel, the data will be saved.