Table of Contents
What is a Custom Field?How to Create Custom Fields
Managing, Editing, and Disabling Custom Fields
Adding and Removing Custom Fields to Configurable Items
What is a Custom Field?
A custom field is a field that can be added to a user profile or within record data based on Jobs, Locations, Regions, Super Regions, Groups, or Record Types. These fields are reportable, meaning they can be pulled up as columns in related browsers.
User Attributes
User-based custom fields can be added to Jobs, Locations, Regions, Super Regions, and Groups. This means that the custom field will appear on the profile of any user that meets the criteria. For example: if you employ Bus Drivers and Bus Cleaners, but only Bus Drivers wear uniform, you can create a "Uniform Size" custom field and add it to the Bus Driver job. You would then be able to add and filter by a column for that custom field in any of DriverHub's people-based browsers.
Record Attributes
Record-based custom fields can only be applied to records. This means that the custom field will appear within the data of the record itself. For example: if your company runs drug screens with multiple providers, you can add a custom field for "Provider" and then add it to the Drug Test record type. This would allow you to pull reports filtered by drug screen facility from any of DriverHub's record-based browsers.
How To Create Custom Fields
You can create custom fields within the Custom Fields Configuration Tool or create them on the fly when you are in the process of creating or editing one of the configurable items that is compatible with custom fields.
Using the Configuration Tool
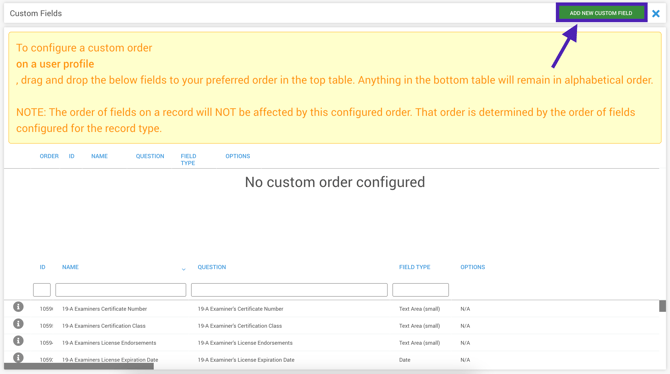
- Navigate to Config > Customizable Fields > Custom Fields to see a list of all existing custom fields.

- Click Add New Custom Field.
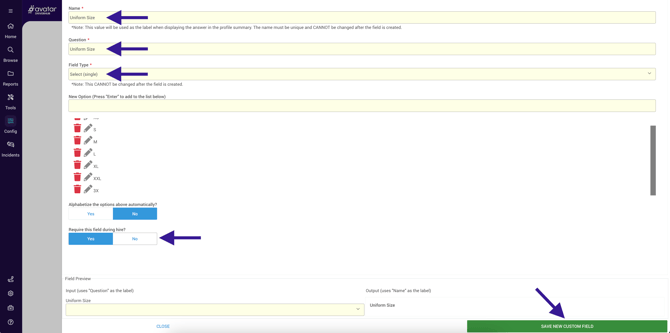
- Choose a Name and Question for your custom field, a Field Type, and add options if applicable. After that, decide if you want to Require this field during hire, which means it will appear on the hiring screen when approving a candidate. Finally, click Save.
- Note: Options only apply to Select (single) and Select (multiple) field types. Once you've added options, you can reorder them by dragging and dropping, edit them by clicking on the pencil, or delete them by clicking on the red trash can.
- Note: Options only apply to Select (single) and Select (multiple) field types. Once you've added options, you can reorder them by dragging and dropping, edit them by clicking on the pencil, or delete them by clicking on the red trash can.
Creating Custom Fields On The Fly
- When you are in the process of editing a Job, Location, Region, Super Region, Group, or Record Type, you will see a Create New button at the bottom of the Custom Fields drop-down selection list.

- Clicking this button will take you to the dialog box to create a new custom field, and once you are complete, you will return to the screen you were working on.
Field Types
Checkbox: A simple checkbox to indicate an answer of yes or no.
Date: A calendar to select a date.
Date and Time: A calendar and clock to select a date and a specific time.
Date Range: A calendar view to choose a start and end date.
Select (single): A dropdown menu that allows the user to select one option.
Select (multiple): A dropdown menu that allows the user to select multiple options.
State (single): A dropdown menu that allows you to select one state or province.
State (multiple): A dropdown menu that allows you to select multiple states or provinces.
When you create a State (single) or State (multiple) list, you can choose from U.S. states, Canadian provinces, or Mexican states. You can also add or remove entries as you see fit.
Text Area (small): A one-line text entry field allowing short text answers.
Text Area (big): A multi-line text entry field allowing longer text answers.
Managing, Editing, and Disabling Custom Fields
- Navigate to Config > Customizable Fields > Custom Fields.
- Click on the custom field you want to edit or disable.
- In the window that opens, you can make changes as needed:
- Edit the question, the options, or the toggles for alphabetizing options and requiring the custom field upon hire. You cannot edit the custom field's name or field type.
- Disable the field entirely by clicking on Disable.

- Disabled custom fields can be re-enabled by clicking back into the custom field and clicking on Enable.

- In order to disable a custom field, it cannot be currently in use on any of the configurable items in DriverHub.
- Disabled custom fields can be re-enabled by clicking back into the custom field and clicking on Enable.
If you need to see if a custom field is being used in the system, you can click on the information button to the left of the custom field's row. ![]() This will show you a list of specific configurable items that have that custom field assigned to it.
This will show you a list of specific configurable items that have that custom field assigned to it.
Adding and Removing Custom Fields to Configurable Items
Once you have some custom fields and/or audit checks created, you can add them to your configurable items (Jobs, Locations, Regions, Super Regions, Record Types, User Groups) from within each item's configuration page. The option to add custom fields will always be at the very bottom.
Although these steps specifically use Jobs as an example, the process is the same for Locations, Regions, Super Regions, Record Types, and User Groups.
Accessing the Configuration
-
Navigate to the configuration page for the specific area you wish to edit. For example, Config > Jobs.
-
Locate the specific item, for example a specific Job, you want to modify and click to open it.
-
Scroll to the bottom of the dialog box to find the custom field selection area.

Adding a Custom Field
-
Select the desired custom field from the drop-down list to add it.
-
Once the field is added to the list, you can optionally use the checkbox on the right to make it required.

-
If the field does not exist yet: Click the Create New button to build a new field from scratch.
-
If there is more than one custom field added, you can click and drag the fields up or down to change their display order, with the exception of required fields which are always remain at the top of the list.
Removing a Custom Field
-
Locate the custom field you wish to remove.
-
Click the trash icon next to the left of that custom field. Note: this removes the field from this specific configurable item only. It does not delete the field from the system entirely.

Important Data Retention Note: If you remove a custom field from a configurable item, the historical data associated with it is not deleted. If you decide to add that custom field back to the item later, the old data will reappear, saving you from having to re-enter it.