In DriverHub, the best way to handle administrative access is to start by assigning rights to groups, not individuals. This approach makes it much easier to manage who can do what across your organization. By creating groups and assigning them the appropriate permissions, managing access becomes a smoother and more consistent process for administrators.
It’s important to stick to this group-first strategy when setting up access permissions, turning to individual adjustments only when there’s a specific need. You may occasionally need to revoke or grant a specific right for one user, but this should be done on a case-by-case basis. These individual edits should serve only to fine-tune the access already established through groups—not replace the group-based permission structure.
The User Rights Interface in DriverHub allows administrators to edit or adjust permissions for a specific user directly within their profile. This provides flexibility for handling unique access needs when required.
Step-by-Step Instructions
Accessing the User Rights Window
-
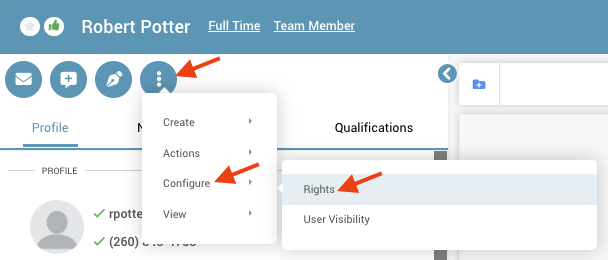
Navigate to the profile of the user whose permissions you want to edit.
-
Click the kabob menu (three vertical dots) located under the user’s name in the upper-left corner.
-
From the dropdown menu, select Configure, then choose Rights.
- Upon opening the Rights dialog box for the first time, a helpful tutorial will guide you through the process of using this tool effectively.

Editing Individual User Rights
In the User Rights window, you’ll see a list of permissions displayed in two columns for easy configuration:
-
Revoked / Available Rights (Left Side) – Displays the rights currently available for assignment to the user. These represent permissions that can be granted.
-
Granted / Group Rights (Right Side) – Displays the rights that the user currently possesses, showing both group-assigned and individually granted permissions.
Each permission can be adjusted directly from this interface using the symbols beside the right’s name.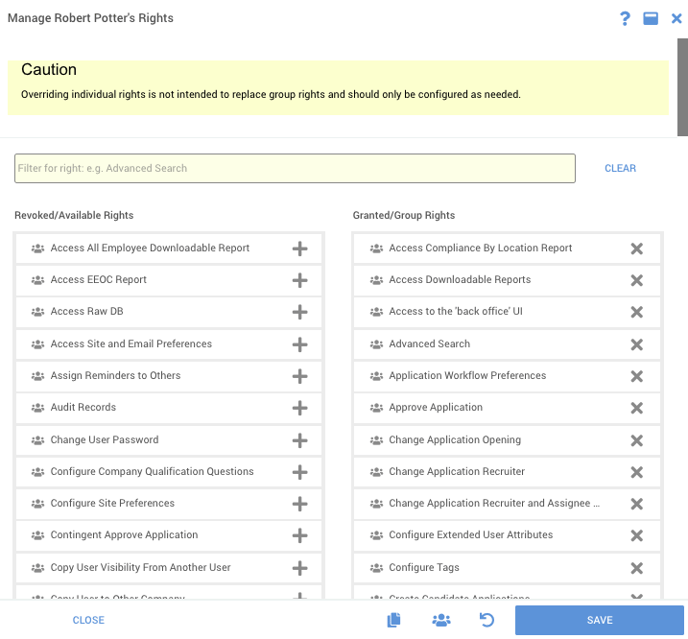
Granting a Right
-
To grant a right to a user, click the ‘+’ symbol next to the desired right in the Revoked / Available Rights column.
-
The selected right will move to the Granted / Group Rights column.
-
The right will be highlighted in yellow, indicating it has been individually granted to the user (separate from group rights).
Revoking a Right
-
To revoke a right that was granted through a group, click the ‘×’ button next to that right.
-
This moves the right back to the Revoked / Available Rights column and marks it in red, showing that the user no longer inherits it from the group.
-
-
To revoke a right that was granted individually, click the ‘−’ button.
-
The right will move back to the Revoked / Available Rights column without the red highlight, indicating it has simply returned to its default group-based configuration.
Continue granting or revoking rights as needed until all updates are complete.
-
Saving Your Changes
-
When finished, click Save in the lower-right corner of the window.
-
You’ll be prompted to confirm your updates.
-
Click Save again to finalize your changes.